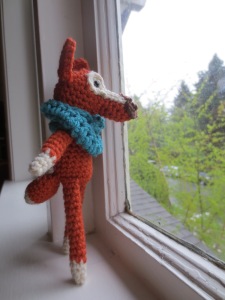
I wrote a little story about this foxy guy recently and about how I really wanted a little fox toy for my son but could never find exactly what I was looking for. After playing around with my limited amigurimi skills, I came up with this little dude, whom I am enamoured of. He is rad. Make one. He`s easy peasy.

a foxy little guy
This foxy little man is an easy afternoon project but if you haven`t done much amigurimi, I would suggest playing around with it a little as the smaller pieces (arms and legs) can be a bit finicky because of how few stitches they use. This is probably the 5th amigurimi project I`ve done so it ranks somewhere on the beginner scale, I would guess.
Supplies: worsted weight wool in cream, orange and brown, a 5mm crochet hook, a 3.75 mm crochet hook, darning needle, safety eyes (or embroidery thread if you prefer to embroider eyes on), scissors
Note: all pieces (except for the ears) are worked in the round – do not join at the end of each round.
Another Note: as with all my tutorials, please feel free to convo me if any of the steps are confusing. I didn’t include any process pictures with this tutorial but am willing to add some if it is just too darn confusing
Eye Pieces (make 2): with cream wool and 3.75mm hook
R1: Make a magic circle and sc 4 into circle
R2: 2sc in each stitch around (8)
R3: Chain 6, 2sc in 2nd chain from hook then sc back down the chain
R4: sc around your circle and sl st into base of chain to finish off, leave a long tail for assembling
Snout: with orange wool and 5mm hook
R1: Make a magic circle and sc 4 into circle (4)
R2: 2sc in each stitch around (8)
R3-R6: sc 8
R7: *sc, sc, sc2tog*, repeat ** (6), finish off leaving a long tale for assembling
Nose: using brown wool and 3.75mm hook
R1: make a magic circle and sc 5 into circle
R2: 2sc in each stitch around (10), finish off, leave a long tail for assembling
Head: with orange wool and 5mm hook
R1: make a magic ring and sc 5 into it (5)
R2: 2sc in each stitch around (10)
R3: *sc, 2sc*, repeat ** 5 times (15)
R4: *sc, sc, 2sc*, repeat ** 5 times (20)
R5-R9: sc in each st around (20 each round)
Attach safety eyes between R5 and R6 by first putting the eye through the centre of the circle in the cream eyepiece and then attaching through the head. The long pieces of the eye piece will be attached down the snout (look back at the finished pic to see what that looks like)
R10: *sc, sc, sc2tog*, repeat ** 5 times (15)
Stuff and attach the snout. Stuff the head
R11: *sc, sc2tog*, repeat ** 5 times (10)
R12: sc2tog x 5 (5), finish off and leave a long tail
Attach snout. Finish attaching cream eye pieces to head and down snout. Attach brown nose piece over the end of the snout
Body: with orange wool and 5mm hook
R1: make a magic circle and sc 6 into it (6)
R2: 2sc in each stitch around (12)
R3: *sc, 2sc*, repeat ** 6 times (18)
R5 – R11: sc in each stitch around (18 in each round)
R12: *sc, sc, sc, sc, sc2tog*, repeat ** 3 times (15)
R13: *sc, sc, sc, sc2tog*, repeat ** 3 times (12)
R14: *sc, sc2tog*, repeat **4 times (8)
R15: 2sctog x 4 (4), finish off, weave in ends.
Attach head to body.
Arms: using cream and orange and 3.75mm hook (make 2)
R1: with cream wool, make a magic circle and sc 4 into it (4)
R2: *sc, 2sc*, repeat ** 1 time (6)
R3: sc each stitch around (6)
R4: sc each stitch around (6) and switch colours (here`s a great link for changing colours)
R5-R12: sc in each stitch around (6 in each round), finish off and leave a long tail for assembling
Legs: using cream and orange and 3.75mm hook (make 2)
R1: with cream wool, make a magic circle and sc 4 into it (4)
R2: *sc, 2sc*, repeat ** 1 time (6)
R3: sc each stitch around (6)
R4: sc each stitch around (6) and switch colours
R5-R16: sc in each stitch around (6 in each round), finish off and leave a long tail for assembling
Ears: using orange wool and 3.75mm hook
R1: ch2, 2sc in 2nd chain from hook, ch1 and turn (2)
R2: sc in each stitch, ch1 and turn (2)
R3: 2sc in each sc, ch1 and turn (4)
R4: sc in each stitch, ch1 and turn (4)
R5: 2sc, sc, sc, 2sc, ch1 and turn (6)*
*you can finish the ear here and bind off or you can do a row of sc all the way around your triangle (putting 2sc in each corner). Finish off and leave a long tail for assembling
Tail: using cream and orange wool and a 3.75mm hook
R1: using cream wool, make a magic circle and sc 3 into it (3)
R2: 2sc in each stitch (6)
R4: 2sc in each stitch (12)
R5: sc in each stitch (12)
R6: *sc, sc, sc 2sc*, repeat ** 3 times (15), change colour
R7 – R10: sc in each stitch around (15 in each round)
R11: *sc, sc, sc, 2sctog*, repeat ** 3 times (12)
R12: *sc, sc, 2sctog*, repeat ** 3 times (9)
R13: *sc, 2sctog*, repeat ** 3 times (6), fasten off, leave long tail to assemble
Attach arms, legs, ears (I curved the ears a little when attaching them, see picture) and tail! And voila! Foxy Foxerton!
I want to get out there, with my foxy friends. Oh, that I had working legs.

April 19, 2013 at 2:38 pm
I love it! Thank you for the pattern.
April 19, 2013 at 6:14 pm
Thank you so much!! I`m new to writing patterns so please feel free to message me or email me at 37calvertrd@gmail.com if something is confusing or you need more detailed pictures of the process. Would love to see a picture of your little foxy!